
Selecting Measuring Tools: Match Tolerance to Tool Class
By Priya Deshmukh • 10th Oct

When selecting measuring tools for your shop floor, skipping the math behind tolerance requirements costs more than just calibration fees, it fills your scrap bin. This measurement tool selection guide cuts through spec sheet noise with a step-by-step system I've stress-tested across aerospace cells and job shops. Forget chasing resolution specs; your actual tolerance band dictates the tool class. And remember: If operators can't repeat it, it doesn't measure. Let's fix that.
Why Tolerance Dictates Your Tool Class (Not Vice Versa)
You're chasing scrap reduction, not theoretical perfection. Start with your part's tolerance (±0.1mm on a shaft diameter, for example). Then apply the 10:1 rule: Your tool's accuracy must be at least 10x tighter than the tolerance. This isn't bureaucracy, it's physics. MIL-STD-120 and ASME B89.7.3 standards codify this to prevent measurement error from drowning out real part variation. For a quick refresher on bias, repeatability, and resolution, see our measurement error types guide.
Example: A 50mm shaft with ±0.05mm tolerance needs a tool accurate to ±0.005mm. A standard digital caliper (±0.02mm) fails here, it'll accept bad parts or reject good ones. But dial indicators with ±0.002mm resolution? They'll survive the morning chill in your unheated bay.
Why 10:1? Three real-world consequences when you skip it:
- False accepts that breach customer specs (e.g., shipping parts at 50.049mm when your customer measures with tighter tools)
- False rejects spiking scrap rates by 15-30% (confirmed by ASQ audit data)
- GR&R explosions when operators 'thump' calipers, a 38% gauge R&R killing your Cpk
Remember that caliper swap I made after seeing operators palm-grip pressure vary? Same part, new force-limiting jaws, and a two-minute teach-back. GR&R dropped to 12%. The tool didn't change, the handling did. That's where your tool selection starts.
Step-by-Step Tool Selection for Shop-Floor Reality
Step 1: Lock Down Your True Tolerance Requirement
Don't grab the blueprint, or you'll miss hidden constraints. Cross-check these three sources:
- Customer specs (e.g., AS9100 requires ±0.005mm for turbine blades)
- Process capability data (What's your current Cpk? If it's 1.33, your tool needs 4x the tolerance margin)
- Environmental hits (Coolant splash? Vibration? Budget ±0.002mm extra for thermal drift)
Operator checklist:
✔️ Confirm tolerance includes form errors (flatness, roundness) ✔️ Measure shop temp swings, add 20% error margin if >5°C fluctuation ✔️ Traceability: Does your calibration certificate cover this tolerance band?
Step 2: Match Tool Class to Tolerance (With Cost-Benefit Reality)
| Tolerance Band | Minimum Tool Accuracy | Practical Tool Class | Cost-Benefit Tip |
|---|---|---|---|
| > ±0.5mm | ±0.05mm | Steel rule, tape measure | Skip digital; use hardened rules with wear-resistant graduations |
| ±0.05mm to ±0.5mm | ±0.005mm | Digital calipers, dial indicators | Choose IP54+ for coolant shops; verify jaw parallelism weekly |
| < ±0.05mm | ±0.0005mm | Micrometers, air gages, CMMs | Budget for granite table fixes (never handheld) |
Critical nuance: A Fanttik A10 Pro laser tape (±1/8") works for structural framing (±1/4" tolerance) but fails for cabinet gaps (±1/16"). Tool capability matching means ignoring resolution boasts, focus on where error lives. That $1,200 CMM won't help if your fixtures wobble.
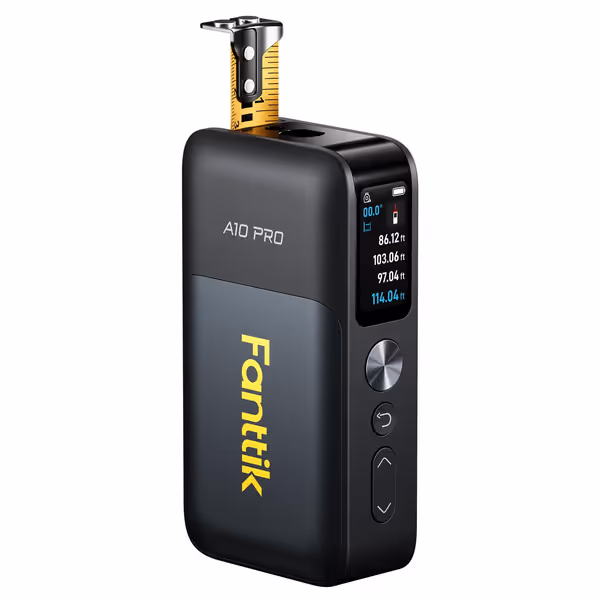
Fanttik A10 Pro 2-in-1 Digital Laser Tape Measure
Dual-mode precision measurement: tape for detail, laser for distance.
$119.99
Laser Accuracy\u00b11/8 inch
Laser Accuracy\u00b11/8 inch
Pros
Seamlessly switch between precise tape and 165ft laser measurement.
Integrated digital angle measurement reduces errors.
Cons
Digital tape accuracy (\u00b11/16 inch) may not meet all high-precision needs.
Requires charging; not always ideal for continuous, remote field use.
Customers find the laser tape measure to be a top-quality tool that works well and is easy to use. They appreciate its accuracy and measurement capabilities, with one customer noting its ability to measure both length and areas.
Customers find the laser tape measure to be a top-quality tool that works well and is easy to use. They appreciate its accuracy and measurement capabilities, with one customer noting its ability to measure both length and areas.
Step 3: Validate Human-Tool Integration (The Repeatable Factor)
Specs lie if operators can't use them consistently. Before signing the PO:
- Glove check: Will thick nitrile gloves fit on buttons? (Jiavarry's 6-inch caliper fails here, knurling is too fine)
- Takt-time test: Time a full measurement cycle. If it's >20% of your cycle time, step down tool class
- Teach-back cue: "Show me how you zero this wearing gloves." If they hunt for the button, reject it
Visual anchor: Glance at the tool's display from 18 inches away. If you squint, it won't survive third shift. Franklin Sensors' light-level uses directional LEDs, ideal for RV frame checks where bubble vials blur in low light.
Step 4: Calculate Total Ownership Cost (Not Just Price)
A $500 tool that lasts 5 years beats a $200 one needing monthly calibration. Map these:
- Hidden costs: Calibration intervals (ask for uncertainty budgets), tip replacements, software licenses
- Scrap ROI: A 0.005mm-accurate micrometer preventing 5 scrapped $200 parts/week pays for itself in 8 weeks
- Training footprint: Tools needing 4-hour training lose value during shift changes
Cost-benefit analysis template:
(Current scrap cost per week) - (Tool cost ÷ life expectancy) > $0? Buy it.
Final Verdict: Tools That Earn Trust on the Floor
Selecting measuring tools isn't about specs, it's about engineering repeatable habits. Your operator's calloused hands interacting with a hardened anvil decide GR&R more than any datasheet. Stop overbuying for resolution; buy for tolerance requirements within your environmental reality. Choose tools that survive coolant, gloves, and rush-hour fatigue. Then train it, then trust it. I've seen 12% GR&R teams become 8% in 3 shifts just by matching tool class to tolerance, and teaching how to touch the tool, not just what to read. Your turn: Grab yesterday's scrap log, find the tolerance band, and apply the 10:1 rule. Fix the handling, not the tool.
Related Articles